Frontend Coding in a Flash with Sublime Text and Emmet
Propelrr
August 4, 2014
Greeting earthlings and coders! Have you ever wondered if there’s a new way to speed up your development process? Well, I know most of us have his own ways of speeding up his web process, and some are still looking for new and faster ways to get his work done in less time.
Well, this is your lucky day my friend. On this post I’m going to show you how Sublime Text and Emmet can improve your development process. So if you’re still using Dreamweaver, you better ditch that thing already. No, just kidding.
Today, we have a variety of lightweight text editors that we can use for coding. Like for example, now we have Textmate, Espresso, Coda, NetBeans, and Sublime Text, which I am currently using, and many other text editors.
So why use Sublime text? Well, I use Sublime because it’s free, very lightweight, it works for both Mac and Windows, and have some several plugins and add-ons you can download for free using the package control depending on the programming language you are using; whether it be HTML, PHP, Symphony, Twigg or simply CSS. Now, on this post I will be discussing on one specific plugin I am using to speed up my coding, which is Emmet for Sublime Text.
Emmet is really a lifesaver when it comes to coding for us frontend developers. Using this tool allows us to use shortcuts, so you don’t have to type in the whole code or even whole sets of code on your editor. Example, when starting your HTML document, instead of typing the whole Doctype, HTML, head, meta, title, and body, you can simply just type in ‘html:5’ to generate the whole set of codes with closing tags, of course. Very convenient, eh?
So let’s get started by downloading and installing Sublime text. If you have none, you can just click on this link for the download. After installing Sublime, you have to install ‘Package Control’ so you can get all the add-ons that you can use. To install Package Control, just open your Sublime text console through ‘View > Show Console’ or you can just press on Ctrl + `. Then just copy and paste the python code from this link to the console at the bottom of your Sublime text document. After installation, restart your sublime text.
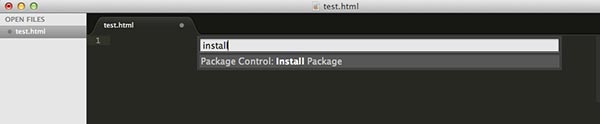
When the application restarts, hit on Ctrl + Shift + P on your keyboard. Then, type in ‘Install Package’ on the textbox and hit enter.
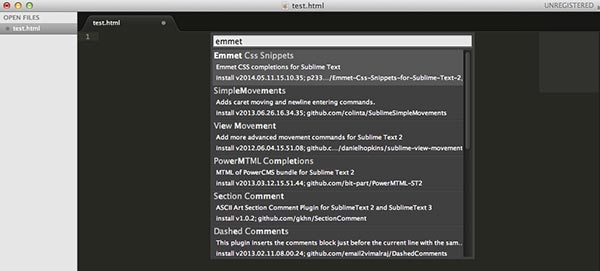
On the list, just search for Emmet and hit on enter to install it. Then, you’re all set to use the plugin.
Now that you have successfully installed Sublime and Emmet, it’s time for you to learn some pretty cool shortcuts. So let’s start by creating a new file and saving it as ‘test.html’ or you can just name it as any filename you want.
Tip: Emmet won’t work unless you save your file.
Lesson One: The Basics
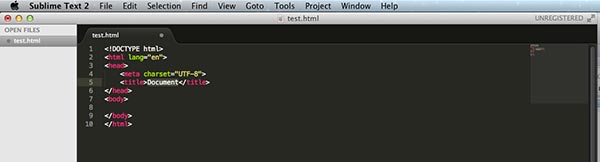
To get you up and running, type in ‘html:5’ and hit tab on your keyboard.
Aaand Wallah! The whole HTML code is generated for you in a snap.
Now isn’t that just amazing?

Well, we’re just getting started my friend. You’ve got a whole bunch to learn. You can basically try any HTML tag and just hit tab to generate the syntax.
Tip: Always remember to hit ‘Tab’ after entering every shortcut to generate the syntax.
Now that you know the basics, let’s get moving to the next lesson.
Lesson Two: Operators
On this part we are going to learn about syntax combinations using operators. To generate shortcuts with syntax combinations, we must first learn how each operator that we are going to use in the process works. So let’s start with the most common ones.
The Child “ > “ Operator
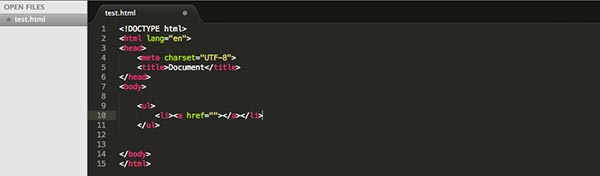
We can use the child operator if we have nested elements.
Ex. A list with an anchor text. To generate that, we can do this:
ul>li>a
The Sibling “ + “ Operator
We can use the sibling operator if two or more elements are of the same level.
Ex. A Div Element with an H1 and span element.
div>h1+p
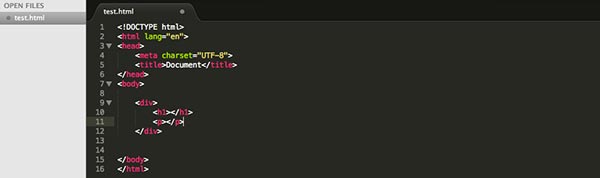
As you can see in this illustration, both h1 and p are siblings and child elements of div.
Yes, we can use combinations of operators so don’t be afraid to try and experiment.
Next is the Multiplication “ * “ Operator
You can simply use this operator to generate multiples of the same elements or duplicates.
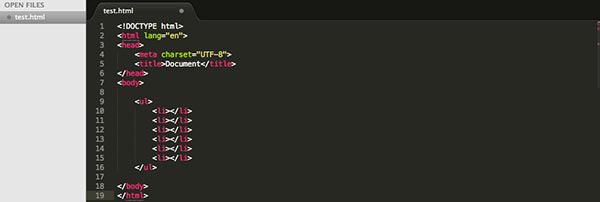
Ex. A list with six items.
ul>li*6
And Next is the Climb-up “ ^ ” Operator, which I don’t really use much.
You can use this operator to climb up one level on a nested element to make it the same level with the parent element.
Ex.
section>div>a>span^a
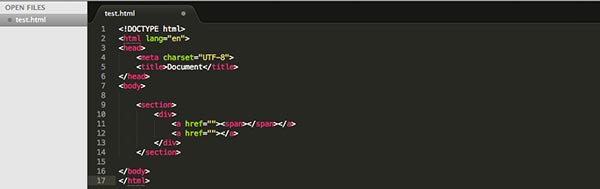
So what happened here is that the ‘a’ after span climbed up one level and became a sibling of the other ‘a’ with the span child element. This could be a little confusing; the next lesson will explain why I don’t really use this operator that much.
Now, why don’t we have a lil’ fun and try some combinations out of these operators and see what happens when it’s generated?
Lesson Three: Grouping
Grouping elements together to avoid confusion.
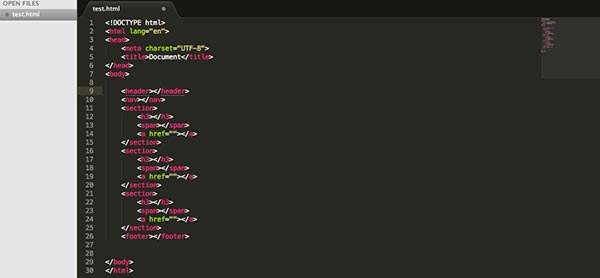
Now as we get familiar with the operators, sometimes our shortcuts get too long that sometimes we get confused or the syntax generated is not what we expected it to be. Let me give you an example. Let’s say you have a header, a nav, three sections and all have an h3, a span and an a; then a footer.
So without grouping, we could get confused and could type the shortcut this way:
header+nav+section*3>h3+span+a+footer
Quite tough, right? And it didn’t even turn out to be what we wanted. So the trick here is to group some of the elements together, specifically the ones with multiples and child elements.
To group elements together we use the parenthesis ().
And to fix the shortcut we had a while ago with the applied grouping, this is how it’s going to look like:
header+nav+(section*3>h3+span+a)+footer
So there we go lads, we can make more complex shortcuts with the right generated syntax by using the operators and the grouping.
Lesson Four: ID and Classes
Okay, now for the easier part. For defining an ID or a Class, we can use the CSS syntax. #ID To define an elements ID, we use the sharp sign after the HTML tag. Ex. A Div with id=”section1”. div#section1 Div with ID .Class As for class names, it’s basically the same with the ID. Ex. A span with class=”navlinks”. span.navlinks Div with Class Tip: For Div’s, you can just type the Class name or the ID, and it will automatically generate a Div with an ID or a class name. Lesson Five: Custom Attributes To use the custom attribute for an element, we use Box Brackets “[ ]”. Ex. An image with alt=”Background” and title=”Background Image”. img [alt=”Bg” title=”BG Image”] Custom Attributes And to wrap it all up, just a few extra ticks before I end this tutorial. I find this very useful when prototyping especially when you still don’t know what the contents are. It’s the ‘Lorem Ipsum’ generator. To generate this, just type lorem and then the number of words to be generated. Example lorem100, it will generate lorem ipsum with 100 words. And lastly, somehow you might want to name your classes with a sequence of numbers; like if we have some links and you would like to name them links 1-6. Now to do that, we can use this shortcut ‘$’ + *(number of elements). Example ul>li.links$*6, which will give you this output: Itemized Class So there we go boys and girls, you have just learned the power of Emmet and Sublime text. Just keep on practicing on these shortcuts and once you get familiar with all of these, you’ll be coding in a flash than you used to; I promise you that. For complete documentations of the plugin you can just refer to this link. I hope you enjoyed reading this post. You may also want to check another post about some Hacks in using Bootstrap for a Custom WordPress Theme. Cheers!