Kick-Ass Bootstrap Hacks For Custom WordPress Themes
Propelrr
July 4, 2014
Ever found yourself creating a WordPress Theme for your website, a client’s website or for your personal blog site and all of a sudden you’re stuck on how to create and implement certain website features? I might be able to help you through this article, but first let me present the rationale behind this blog topic.
The Rationale
Most of the time, web designers rely on frameworks such as Twitter Bootstrap when creating websites mainly because these frameworks offer great hacks to improve our coding velocity and efficiency. We may have extensive knowledge on HTML, CSS and jQuery and can code websites from ground-up but we cannot discount the fact that using a framework with ready-made markups and styles greatly helps in rapid coding especially on projects with really tight deadlines.
If you’re one of those who detest coding from scratch, then start thanking God for WordPress and Twitter Bootstrap.
WordPress’ easy-to-use CMS and Twitter Bootstrap’s array of great built-in features and components not only save our arses from doing a lot of coding but also provide us an extensive amount of possibilities to transform your simple website or blog site into an eye-catching, ass-kicking web asset.
Twitter Bootstrap
Twitter Bootstrap’s components, features and plugins are based on HTML, CSS and jQuery which makes it static in a sense. You want your content continuously updated without giving yourself extra work by repeatedly going back to the template source code to hard-code these updates.

Good thing WordPress is there to take care of the content updates. In this article, let me show you some simple solutions and implementations on how to integrate some of Twitter Bootstrap’s amazing features to your WordPress’ dynamic content.
Before we start with the main content of this article, here are some disclaimers and assumptions:
- The following implementations are not the only solutions to your coding problems. They are suggestions born out of experience from using Twitter Bootstrap in WordPress Theme Development.
- You can always tweak the codes that I have provided.
- You are reading this article right now while having your website project files open.
- You are using Twitter Bootstrap as your framework for your Custom WordPress Theme.
So now, buckle up and get your focus on as I will show you three amazingly simple solutions to some of your coding problems.
I. How to create your own Cool Featured Content Slider in WordPress using Twitter Bootstrap Carousel
One of the most common feature of every Content Management System (CMS)-based website is a sequential, automated display of images and text known as a ‘Slider’, which may serve various purposes including, but not limited to the following:
- Publishing your company’s latest news
- Featuring special offers
- Highlighting articles from your blog, and;
- Showcasing your latest projects
Now if you want to do any of the things listed above, you may want to try creating your own Featured Content Slider in your website using Twitter Bootstrap’s Carousel component.
My implementation is very simple:
Markup with HTML -> Initialize with jQuery -> Control content using WordPress’ Querying Loop.
Now that we have marked up our Bootstrap carousel, we need to initialize its automated sequential display function. For those jQuery savvy developers, the following code snippet will start the Carousel motion:
[js]
$(‘.carousel’).carousel();
[/js]
If you want to manually define your carousel behaviors, refer to the table below:
| Name | Type | Default | Description |
|---|---|---|---|
| interval | number | 5000 | The amount of time to delay between automatically cycling an item. If false, carousel will not automatically cycle |
| pause | string | “hover” | Pauses the cycling of the carousel on mouseenter and resumes the cycling of the carousel on mouseleave |
| wrap | boolean | true | Whether the carousel should cycle continuously or have hard stops |
Include the abovementioned options by passing them via your Carousel Initialization.
[js]
$(‘.carousel’).carousel({
interval: 2000,
pause: hover
});
[/js]
Place this jQuery script in your ‘footer.php’ file right before the closing body tag (</body>). Remember that this script must be executed on page load.
Dynamic Content using WordPress Query and The Loop
Now that we have marked up and initialized our slider, we want it now to load the slider contents dynamically from WordPress. This implementation requires basic knowledge about WordPress Custom Post Types and Custom Metaboxes, WordPress Query and Loop.
For this part, I will encourage you to concentrate, read through each step and understand the process. If you don’t, just copy the code and proceed with trial-and-error.
Create a Custom Post Type
First thing to do is to create a custom post type. This will enable us to create, edit and delete slides that will appear in our Slider.
Create a file, name it something like, ‘meta-slides.php’. Include it in your ‘functions.php’ file via
include (‘path/to/meta-slides.php’);
Copy and paste the following code snippet:
[php]
function custom_slide_post_type(){
$labels = array (
‘name’ => __(‘My Custom Slides’),
‘singular_name’ => __(‘Slide’),
‘add_new’ => __(‘Add New’),
‘add_new_item’ => __(‘Add New Slide’),
‘edit_item’ => __(‘Edit Slide’),
‘new_item’ => __(‘New Slide’),
‘view_item’ => __(‘View Slide’),
‘search_items’ => __(‘Search Slide’),
‘not_found’ => __(‘No Slides found’),
‘not_found_in_trash’ => __(‘No Slides found in Trash’),
‘parent_item_colon’ => ”,
);
$args = array(
‘labels’ => $labels,
‘public’ => true,
‘publicly_queryable’ => true,
‘show_ui’ => true,
‘query_var’ => true,
‘has_archive’ => true,
‘capability_type’ => ‘post’,
‘hierarchical’ => true,
‘menu_position’ => null,
‘supports’ => array( ‘title’, ‘editor’, ‘thumbnail’, ‘page-attributes’ ),
);
register_post_type( ‘custom_slide’, $args );
}
add_action( ‘init’, ‘custom_slide_post_type’ );
[/php]
Add WordPress Custom Metabox
This part of the process is optional. But if you want each of your slide to have a customizable Call-to-Action button, please include this step in the process.
To create a custom metabox for your slide, go back to your ‘meta-slide.php’ file.
Copy and paste the following code snippets after the add_action('init', 'custom_slide_post_type'); statement.
Part 1: Setup your Custom Metabox
This part of the code initializes your Custom Metabox and adds it to the existing post types in the WordPress Structure.
[php]
add_action( ‘load-post.php’, ‘slide_link_metabox_setup’ );
add_action( ‘load-post-new.php’, ‘slide_link_metabox_setup’ );
function slide_link_metabox_setup() {
/* Add meta boxes on the ‘add_meta_boxes’ hook. */
add_action( ‘add_meta_boxes’, ‘add_slide_link_metabox’ );
/* Save post meta on the ‘save_post’ hook. */
add_action( ‘save_post’, ‘save_slide_link_metabox’, 10, 2 );
}
function add_slide_link_metabox() {
add_meta_box(
‘slide-link’, // Unique ID
esc_html__( ‘Slide Link’, ‘slide-link’ ), // Title
‘slide_link_metabox’, // Callback function
‘slide’, // Admin page (or post type)
‘normal’, // Context
‘high’ // Priority
);
}
[/php]
Part 2: Display your Custom Metabox
Now that you have initialized your Custom Metabox, it’s time to display it on the WordPress Admin Content Editor of the Slider Custom Post Type.
Copy and paste the following code snippet just after the last line of the code above.
[php]
function slide_link_metabox( $object, $box ) { ?>
<?php wp_nonce_field( basename( __FILE__ ), ‘slide_link_nonce’ ); ?>
<p>
<label for=”slide-link”><?php _e( “Link this slide to the URL below”, ‘slide-link’ ); ?></label>
<br />
<input class=”widefat” name=”slide-link” id=”slide-link” cols=”60″ rows=”5″ value=”<?php echo esc_attr( get_post_meta( $object->ID, ‘slide_link’, true ) ); ?>” />
</p>
<?php }
[/php]
Part 3: Saving the Data Input from your Custom Metabox
[php]
function save_slide_link_metabox( $post_id, $post ) {
/* Verify the nonce before proceeding. */
if ( !isset( $_POST[‘slide_link_nonce’] ) || !wp_verify_nonce( $_POST[‘slide_link_nonce’], basename( __FILE__ ) ) )
return $post_id;
/* Get the post type object. */
$post_type = get_post_type_object( $post->post_type );
/* Check if the current user has permission to edit the post. */
if ( !current_user_can( $post_type->cap->edit_post, $post_id ) )
return $post_id;
/* Get the posted data */
if(isset( $_POST[‘slide-link’] )) :
$new_meta_value = $_POST[‘slide-link’];
endif;
/* Get the meta key. */
$meta_key = ‘slide_link’;
/* Get the meta value of the custom field key. */
$meta_value = get_post_meta( $post_id, $meta_key, true );
/* If a new meta value was added and there was no previous value, add it. */
if ( $new_meta_value && ” == $meta_value )
add_post_meta( $post_id, $meta_key, $new_meta_value, true );
/* If the new meta value does not match the old value, update it. */
elseif ( $new_meta_value && $new_meta_value != $meta_value )
update_post_meta( $post_id, $meta_key, $new_meta_value );
/* If there is no new meta value but an old value exists, delete it. */
elseif ( ” == $new_meta_value && $meta_value )
delete_post_meta( $post_id, $meta_key, $meta_value );
}
[/php]
The engine is almost complete. We now have the capability to add a new slide.
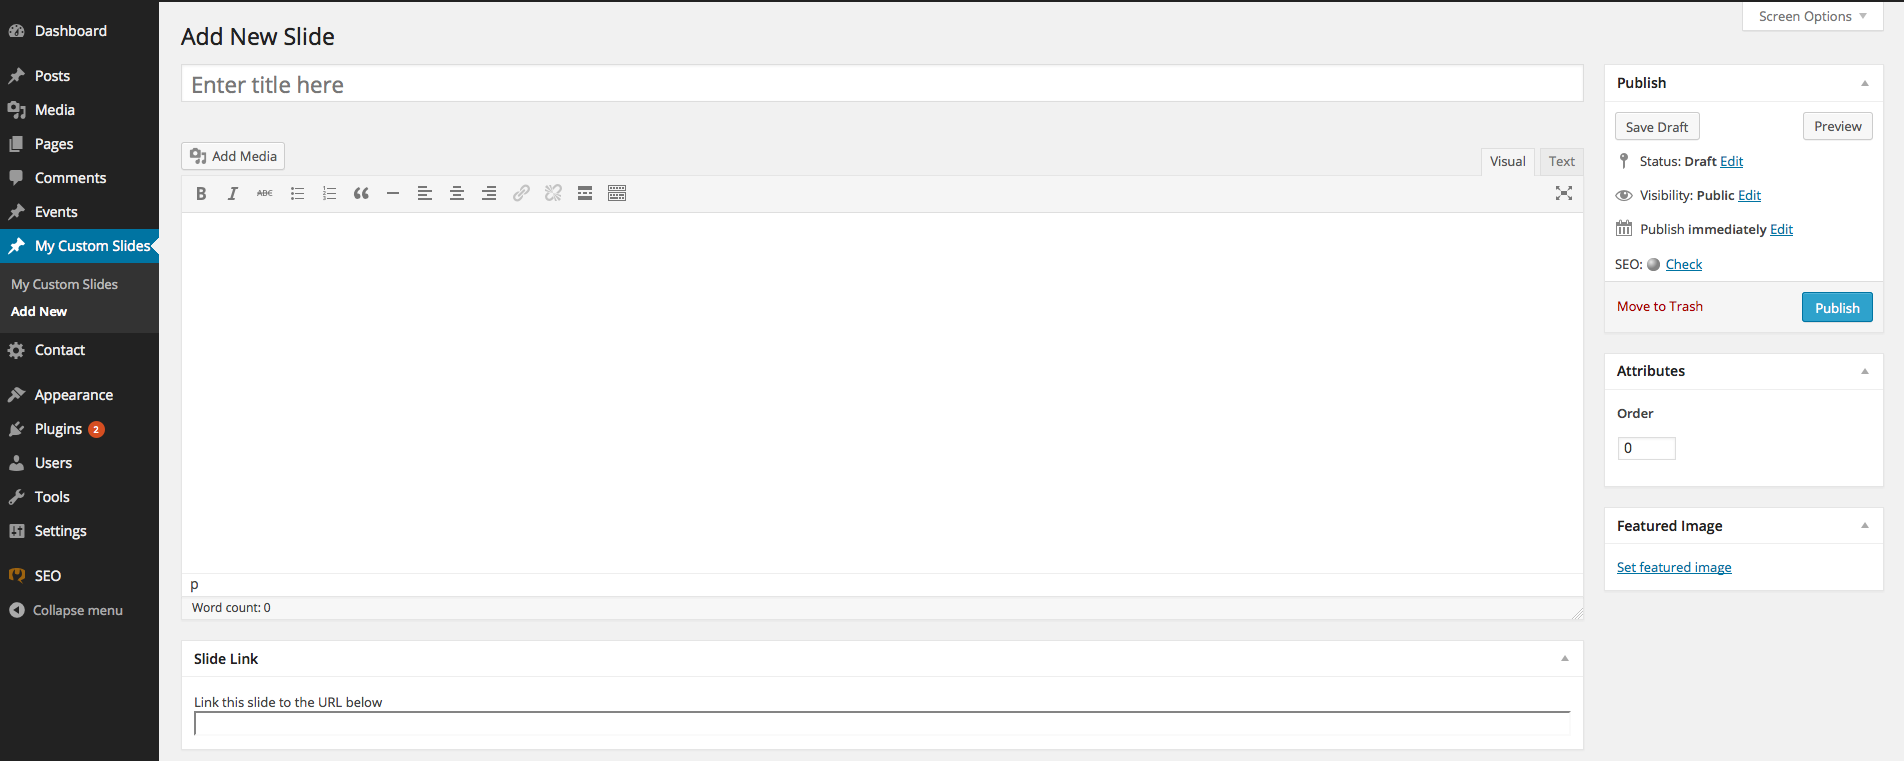
After doing the steps for Creating a Custom Post Type and Custom Metabox, you can now create a new slide to be included in your slider.
The slide creation process is similar to the Post/Page Creation in WordPress.
- The title – This is your slide title. In the later part of this article, I will explain how to include it in your final slide.
- Content Area – If you want to put in some description to your slide
- The Featured Image – Background image for your slide
- Slide Link – The link for your Call-to-Action button
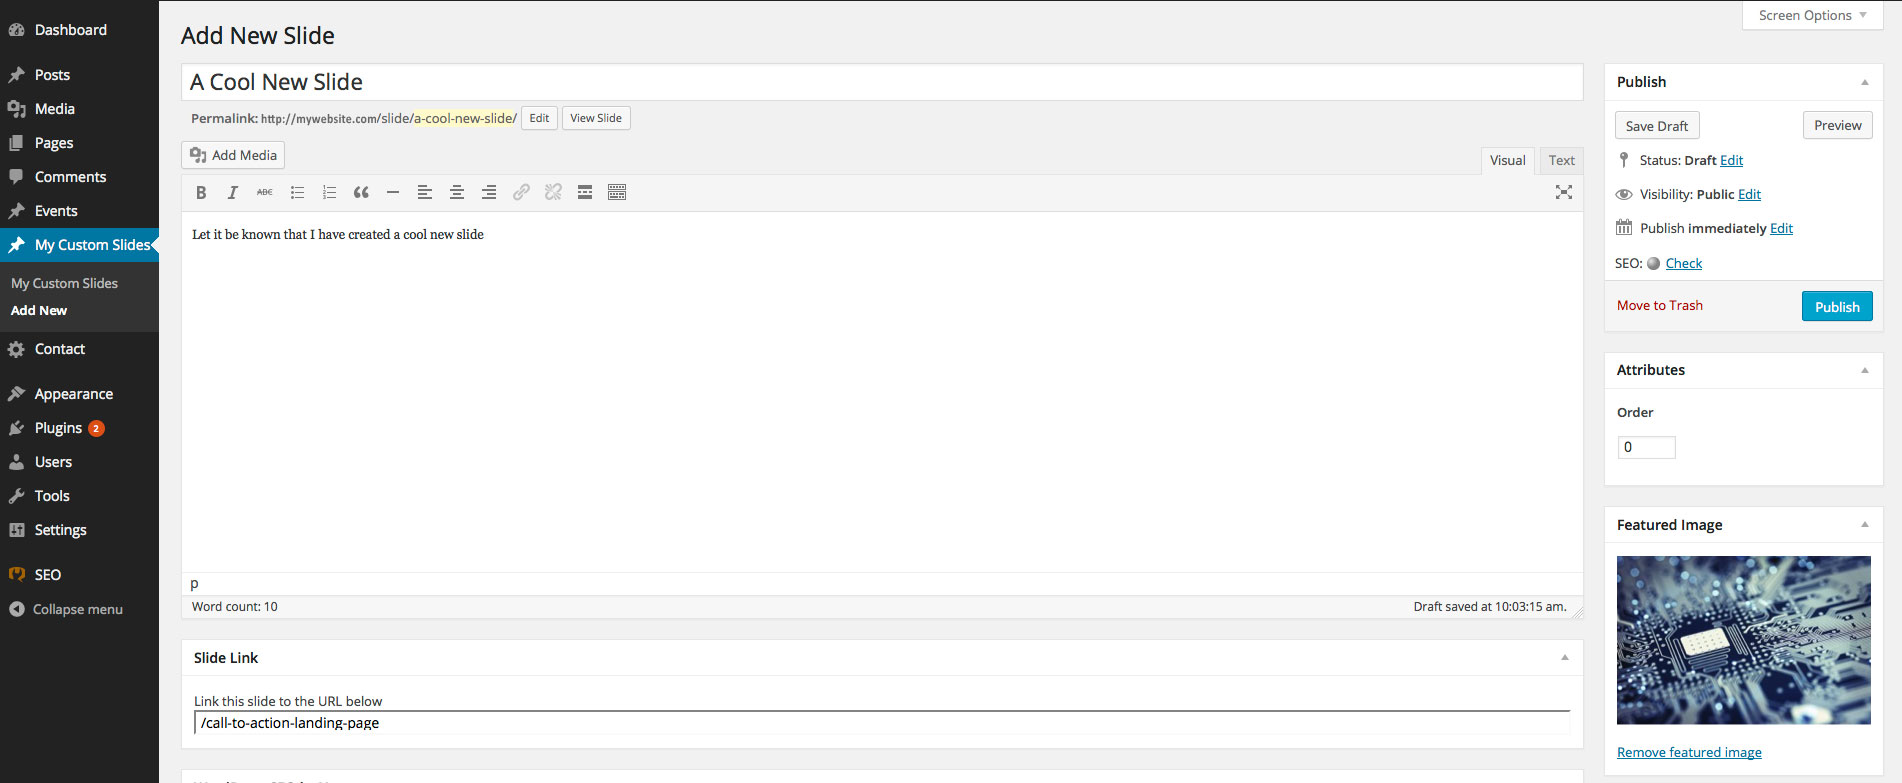
In the image above, I have placed content in the slide. If you have finalized everything for this slide, publish it and proceed to the next step.
Use WordPress Query and Loop to Pull Content from your Created Slide
Remember that you have placed your markup in your desired template file. Now, it’s time for it to pull content from your newly created content, ‘A Cool New Slide’.
Replace your markup with the following code snippet. This will make your slide dynamically pulling content type from your WordPress-created Slide Post Type.
[html]
<div class=”col-md-12 slider”>
<div id=”carousel-example-generic” class=”carousel slide” data-ride=”carousel”>
<!– Indicators –>
<ol class=”carousel-indicators”>
<li data-target=”#carousel-example-generic” data-slide-to=”0″ class=”active”></li>
<li data-target=”#carousel-example-generic” data-slide-to=”1″></li>
<li data-target=”#carousel-example-generic” data-slide-to=”2″></li>
</ol>
<!– Your Slider Content Here –>
<div class=”carousel-inner”>
<!– Each div with class name item is a slide item –>
<!– Use this code To make your slider pull slides and their content from WordPress –>
<?php
$args = array( ‘post_type’ => ‘slide’, ‘posts_per_page’ => 1, ‘orderby’ => ‘ID’, ‘order’ => ‘ASC’ );
$loop = new WP_Query( $args );
while ( $loop->have_posts() ) : $loop->the_post();
?>
<!– Add an ‘active’ class to this div to make this slide appear as the first item –>
<div class=”item active”>
<?php
$thumb = wp_get_attachment_image_src( get_post_thumbnail_id($post->ID));
$url = $thumb[‘0’];
?>
<img src=”<?php echo $url; ?>” alt=”Image Title”>
<div class=”carousel-caption”>
<!– Place caption/title/calls-to-action for your slide –>
<span class=”captionTitle”><?php the_title(); ?></span>
<span class=”captionDetail”><?php the_content(); ?></span>
<a href=”<?php echo esc_attr(get_post_meta( $post->ID, ‘slide_link’, true )); ?>”>YOUR CALL TO ACTION</a>
<!– End slide content –>
</div>
</div>
<?php
endwhile;
wp_reset_postdata();
?>
<!– Show the rest of the slide –>
<?php
$args = array( ‘post_type’ => ‘slide’, ‘offset’ => 1, ‘posts_per_page’ => -1, ‘orderby’ => ‘ID’, ‘order’ => ‘ASC’ );
$loop = new WP_Query( $args );
while ( $loop->have_posts() ) : $loop->the_post();
?>
<!– For the rest of the slide items, remove the ‘active’ class from the div to initially hide the other slides –>
<div class=”item”>
<?php
$thumb = wp_get_attachment_image_src( get_post_thumbnail_id($post->ID));
$url = $thumb[‘0’];
?>
<img src=”<?php echo $url; ?>” alt=”Image Title”>
<div class=”carousel-caption”>
<!– Place caption/title/calls-to-action for your slide –>
<span class=”captionTitle”><?php the_title(); ?></span>
<span class=”captionDetail”><?php the_content(); ?></span>
<a href=”<?php echo esc_attr(get_post_meta( $post->ID, ‘slide_link’, true )); ?>”>YOUR CALL TO ACTION</a>
<!– End slide content –>
</div>
</div>
<?php
endwhile;
wp_reset_postdata();
?>
<!– Controls –>
<a class=”left carousel-control” href=”#carousel-example-generic” data-slide=”prev”>
<span class=”glyphicon glyphicon-chevron-left”></span>
</a>
<a class=”right carousel-control” href=”#carousel-example-generic” data-slide=”next”>
<span class=”glyphicon glyphicon-chevron-right”></span>
</a>
</div>
</div>
[/html]
That’s it! See how your slides appear in your pages.

My website now has a slider containing the ‘A Cool New Slide’ post that we have created. You are free to style your carousel caption area in any way that you want by targeting the class ‘carousel-caption’ and/or its children. I did mine to look like a dialog bubble as shown in the image above.
1. Markup your menu with HTML and CSS with structure and class names provided by Twitter Bootstrap. Copy and paste the following code snippet in the template file that displays your navigation menu. Often, this is placed in the ‘header.php’ file.
[html]
<!– Container for your nav menu –>
<div id=”bs-example-navbar-collapse-1″ class=”collapse navbar-collapse”>
<!– Your menu –>
<ul class=”nav navbar-nav”>
<ul class=”nav navbar-nav”><!– Menu item with no children –>
<li class=”active”><a href=”home”>HOME</a></li>
</ul>
</ul>
<!– End of menu item –>
<!– Menu item with 2 children –>
<ul class=”nav navbar-nav”>
<ul class=”nav navbar-nav”>
<li><a class=”dropdown-toggle” href=”#” data-toggle=”dropdown”>PAGE1</a>
<ul class=”dropdown-menu”>
<li><a href=”/page1-child1″>1st Child of PAGE1</a></li>
<li><a href=”/page1-child2″>2nd Child of PAGE1</a></li>
</ul>
</li>
</ul>
</ul>
<!– End of menu item –>
</div>
[/html]
2. Download wp_bootstrap_walker.php. This is used as your WordPress Menu Walker for your custom Bootstrap Dropdown Menu. Place it anywhere inside your theme folder.
3. Include your walker file in your ‘functions.php’ file.
[php]require_once(‘path/to/wp_bootstrap_navwalker.php’);[/php]
4. Now it’s time to make your menu dynamic. Replace your markup code in the template file (in this case ‘header.php’ file) with the following code snippet:
[php]
<?php
wp_nav_menu( array(
‘theme_location’ => ‘primary’,
‘container’ => ‘div’,
‘container_class’ => ‘navbar-collapse collapse’,
‘menu_class’ => ‘nav navbar-nav’,
‘walker’ => new wp_bootstrap_navwalker())
);
?>
[/php]
5. Add a Menu in the WordPress Admin Panel and check the ‘Primary Menu’ checkbox.

6. Now visit your website and see your Bootstrap navigation menu with the items created from the WordPress Menu Editor.
III. How to create and Ajax Contact Form with Twitter Bootstrap elements
Creating a good contact form for your website with Ajax validation and submission is possible since a good WordPress plugin is already out there—the WP Contact Form 7 (CF7). It will provide you a good framework and data handling machinery.
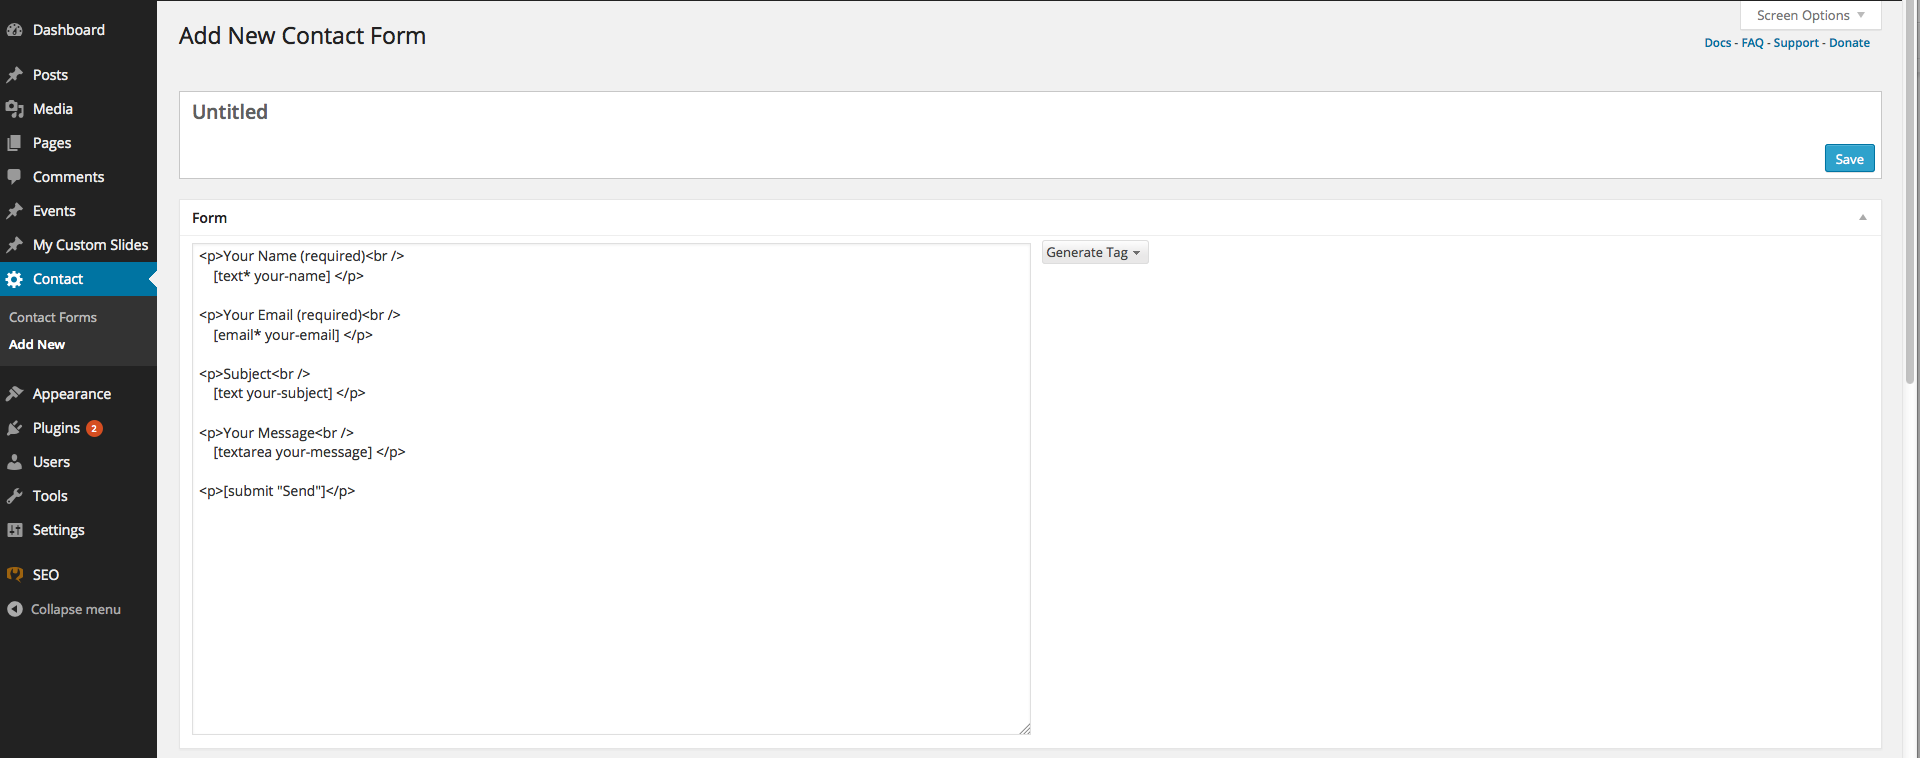
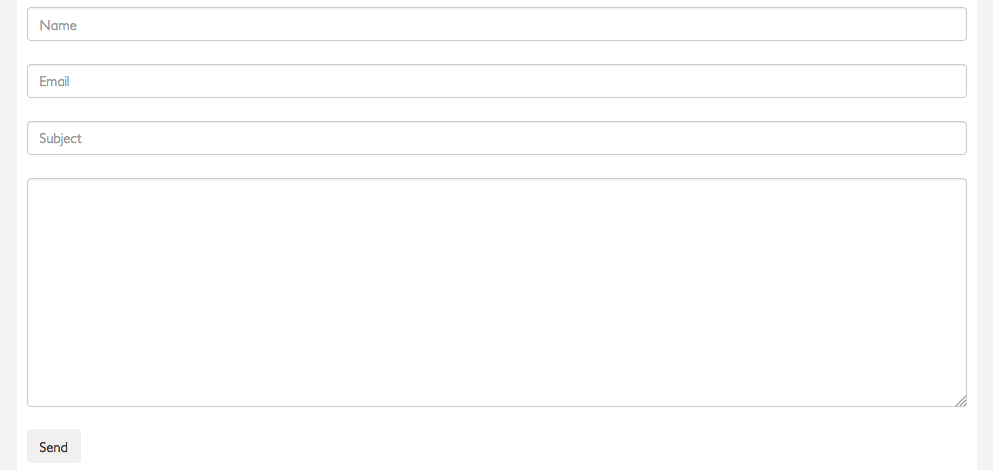
Below is an example of a form created with Contact Form 7:

Now you wouldn’t want to display this bare form in your website, would you? If you want to have a better looking form, here’s how Twitter Bootstrap can help you:
1. Markup your Contact form with HTML and CSS using Bootstrap components
Copy and paste the following code snippet to your page template or the template file for the post type where you want to display your form. For the purpose of this article, let’s add it to the page.php file.
[html]
<form action=”” role=”form” method=”post”>
<div class=”form-group”>
<input type=”” class=”form-control” name=”name” placeholder=”Name”>
<input type=”” class=”form-control” name=”email” placeholder=”Email”>
<input type=”” class=”form-control” name=”subject” placeholder=”Subject”>
<label for=””>Message</label>
<textarea class=”form-control” name=”message” cols=”30″ rows=”10″></textarea>
<button type=”submit” class=”btn btn-primary”>SUBMIT</button>
</div>
</form>
[/html]
2. Create a form using the Admin Panel for Contact Form 7
a. Add New Contact Form
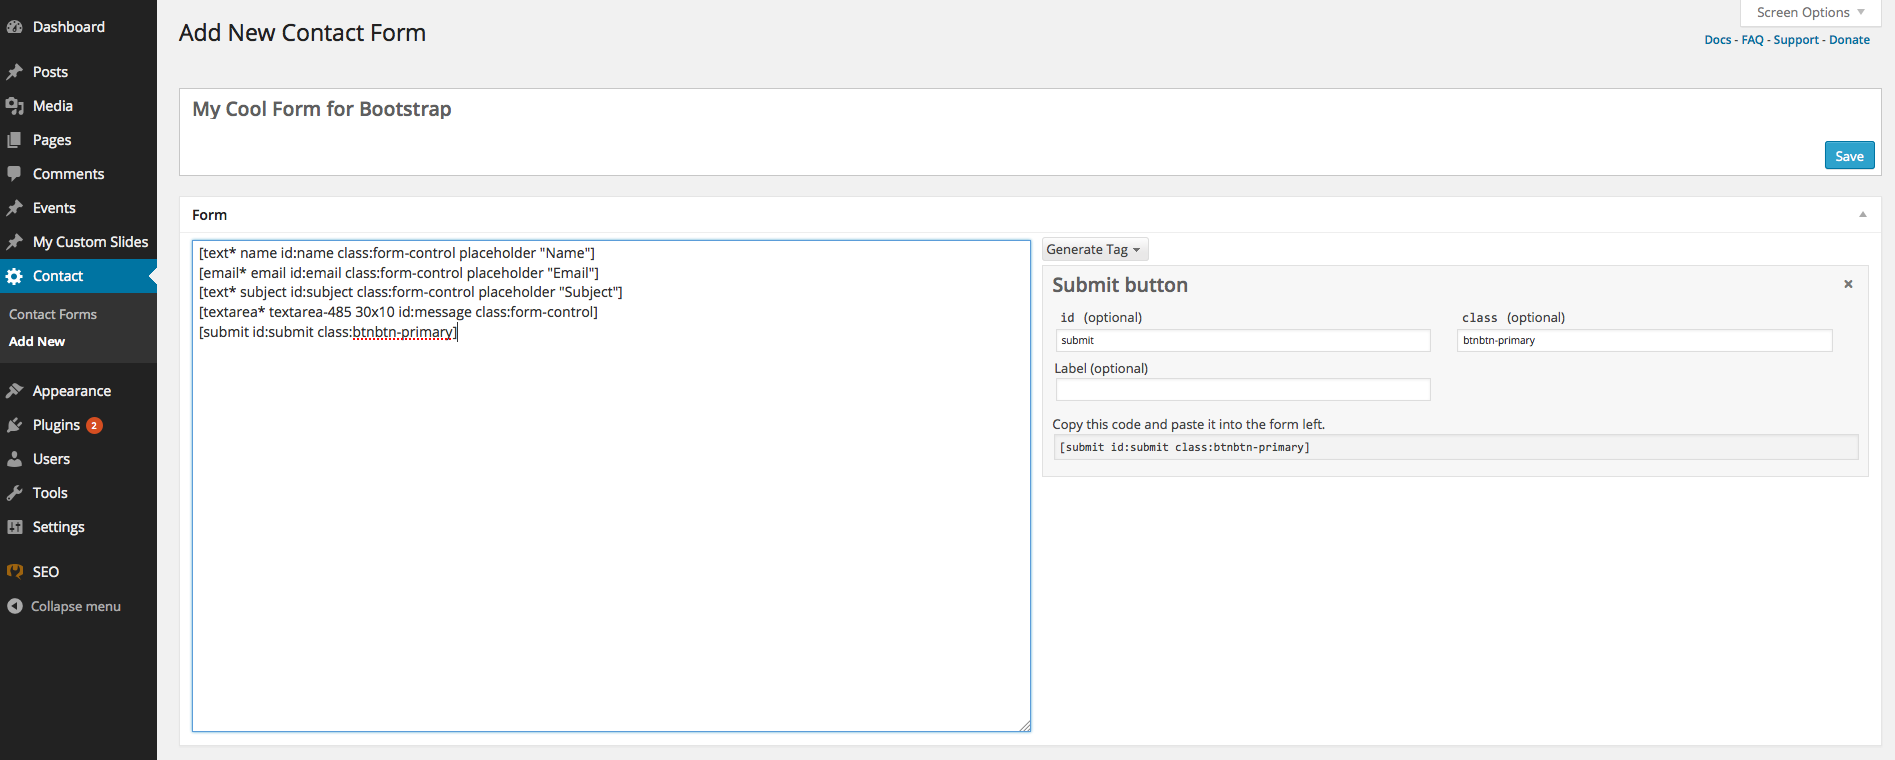
b. Name your form and add your desired form input fields. By default, the plugin gives you 5 form elements: 4 input fields for Name, Email, Subject and Message, and the Submit Button. The trick in the integration is to use the class names used in the Bootstrap markup and put it as the class names in the fields you generated during Contact Form creation. Refer to the screenshots below.
c. Set up the recipient of the submissions done via this contact form. If you want to edit the content of the email message body, do so by editing the contents of the Message Body Box.
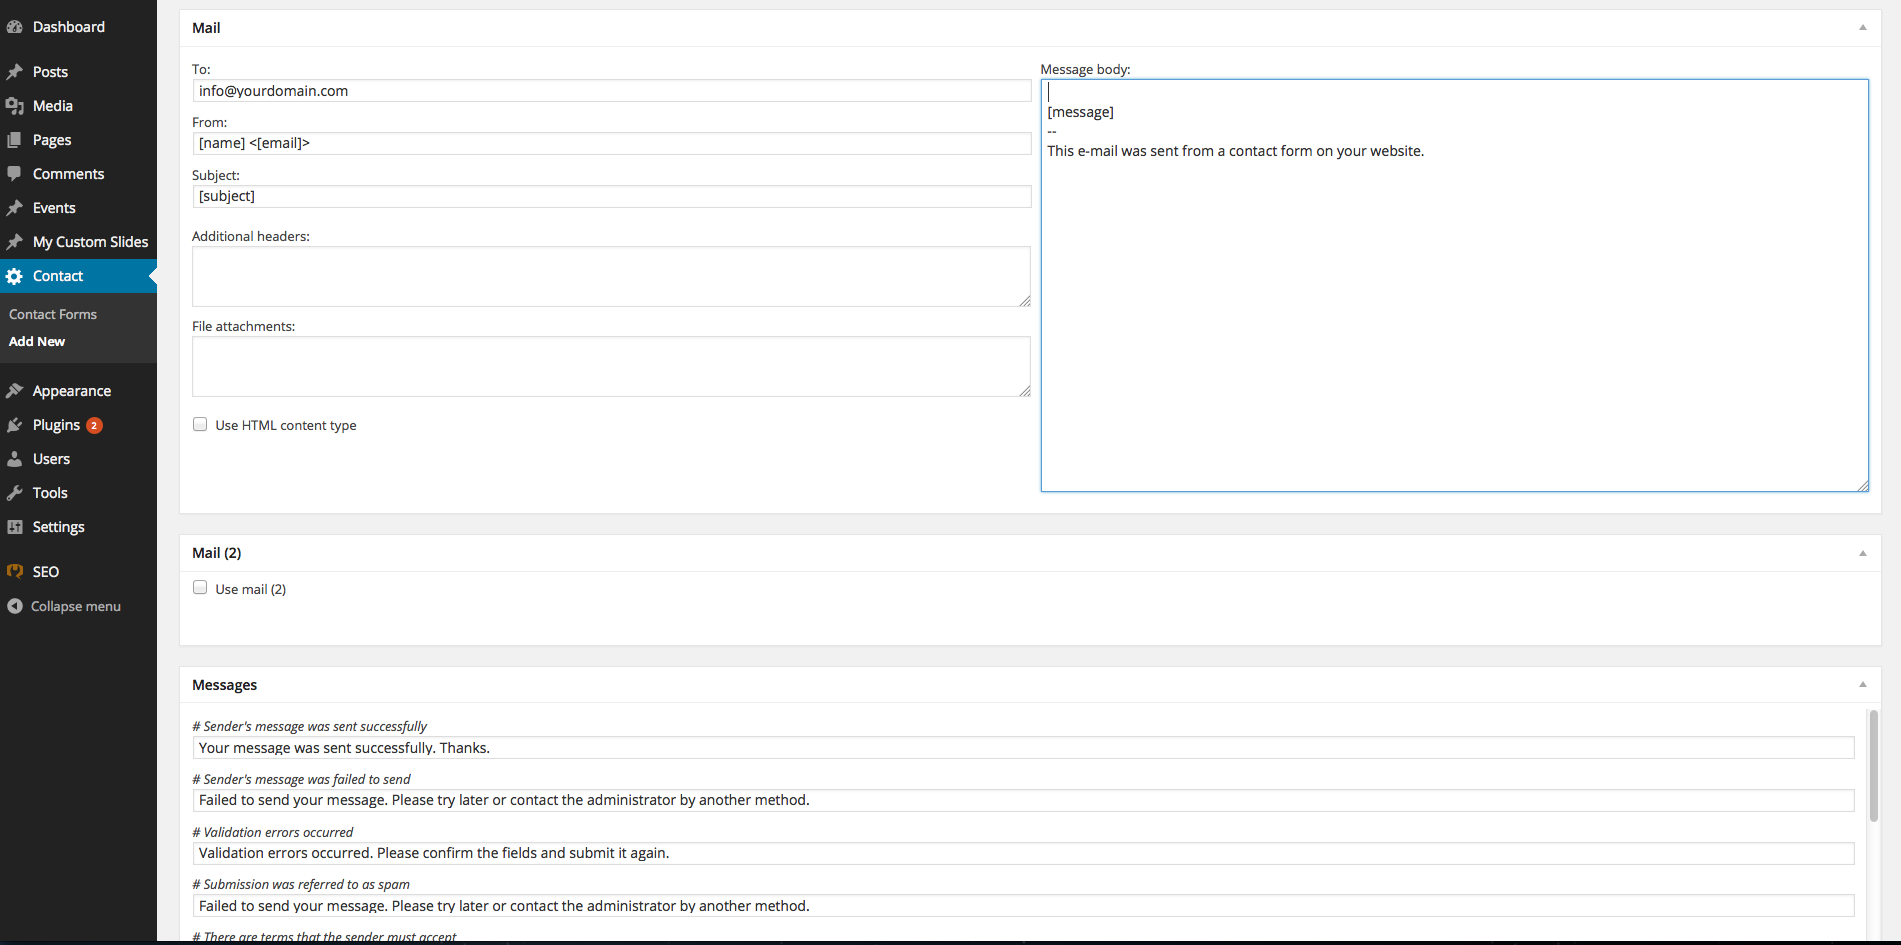
d. Lastly, save your contact form.
4. Integrate Contact Form 7 with your Markup
a. Copy the code generated when you save the contact form you just created. Create a test page in WordPress Admin Panel and paste the code in the content editor area.


b. Go to the page where you embedded the form and inspect its source code.

c. Wrap your existing form markup using a div with id and class name provided by the WP CF7 generated form. Also, copy and paste the action attribute of the form and the hidden input fields from your page to the Bootstrap Form markup.
[html]
<div class=”wpcf7″ id=”wpcf7-f53-p51-o1″>
<form action=”/#wpcf7-f53-p51-o1″ role=”form” method=”post”>
<div style=”display: none;”>
<input type=”hidden” name=”_wpcf7″ value=”53″ />
<input type=”hidden” name=”_wpcf7_version” value=”3.8″ />
<input type=”hidden” name=”_wpcf7_locale” value=”en_US” />
<input type=”hidden” name=”_wpcf7_unit_tag” value=”wpcf7-f53-p51-o1″ />
<input type=”hidden” name=”_wpnonce” value=”64278c75c2″ />
</div>
<div class=”form-group”>
<input type=”” class=”form-control” name=”name” placeholder=”Name”>
<input type=”” class=”form-control” name=”email” placeholder=”Email”>
<input type=”” class=”form-control” name=”subject” placeholder=”Subject”>
<label for=””>Message</label>
<textarea class=”form-control” name=”message” cols=”30″ rows=”10″></textarea>
<button type=”submit” class=”btn btn-primary btnEduCo”>SUBMIT</button>
</div>
</form>
</div>
[/html]
In this case, the class name is ‘wpcf7’ and id is ‘wpcf7-f53-p51-o1’
d. Copy the form fields generated by the WP CF7 created contact form to your Bootstrap form markup.
[html]
<div class=”wpcf7″ id=”wpcf7-f53-p51-o1″>
<form action=”/#wpcf7-f53-p51-o1″ role=”form” method=”post”>
<div style=”display: none;”>
<input type=”hidden” name=”_wpcf7″ value=”53″ />
<input type=”hidden” name=”_wpcf7_version” value=”3.8″ />
<input type=”hidden” name=”_wpcf7_locale” value=”en_US” />
<input type=”hidden” name=”_wpcf7_unit_tag” value=”wpcf7-f53-p51-o1″ />
<input type=”hidden” name=”_wpnonce” value=”64278c75c2″ />
</div>
<div class=”form-group”>
<span class=”wpcf7-form-control-wrap name”>
<input type=”text” name=”name” value=”” class=”wpcf7-form-control wpcf7-text wpcf7-validates-as-required form-control” id=”name” aria-required=”true” aria-invalid=”false” placeholder=”Name” />
</span>
<span class=”wpcf7-form-control-wrap email”>
<input type=”email” name=”email” value=”” class=”wpcf7-form-control wpcf7-text wpcf7-email wpcf7-validates-as-required wpcf7-validates-as-email form-control” id=”email” aria-required=”true” aria-invalid=”false” placeholder=”Email” />
</span>
<span class=”wpcf7-form-control-wrap subject”>
<input type=”text” name=”subject” value=”” class=”wpcf7-form-control wpcf7-text wpcf7-validates-as-required form-control” id=”subject” aria-required=”true” aria-invalid=”false” placeholder=”Subject” />
</span>
<label for=””>Message</label>
<span class=”wpcf7-form-control-wrap textarea-485″>
<textarea name=”textarea-485″ cols=”30″ rows=”10″ class=”wpcf7-form-control wpcf7-textarea wpcf7-validates-as-required form-control” id=”message” aria-required=”true” aria-invalid=”false”></textarea>
</span>
<button type=”submit” class=”btn btn-primary btnEduCo”>SUBMIT</button>
</div>
</form>
</div>
[/html]
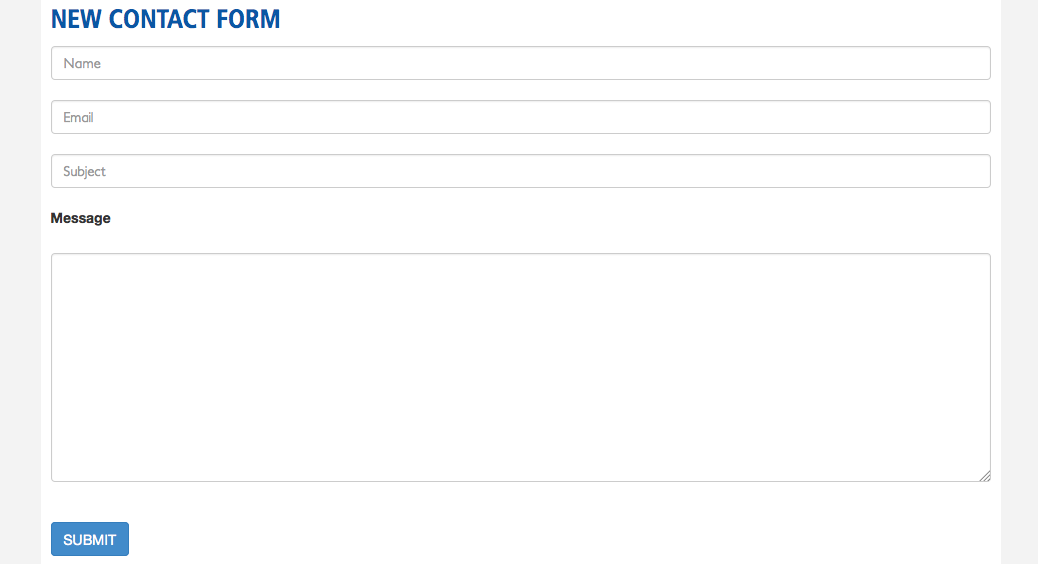
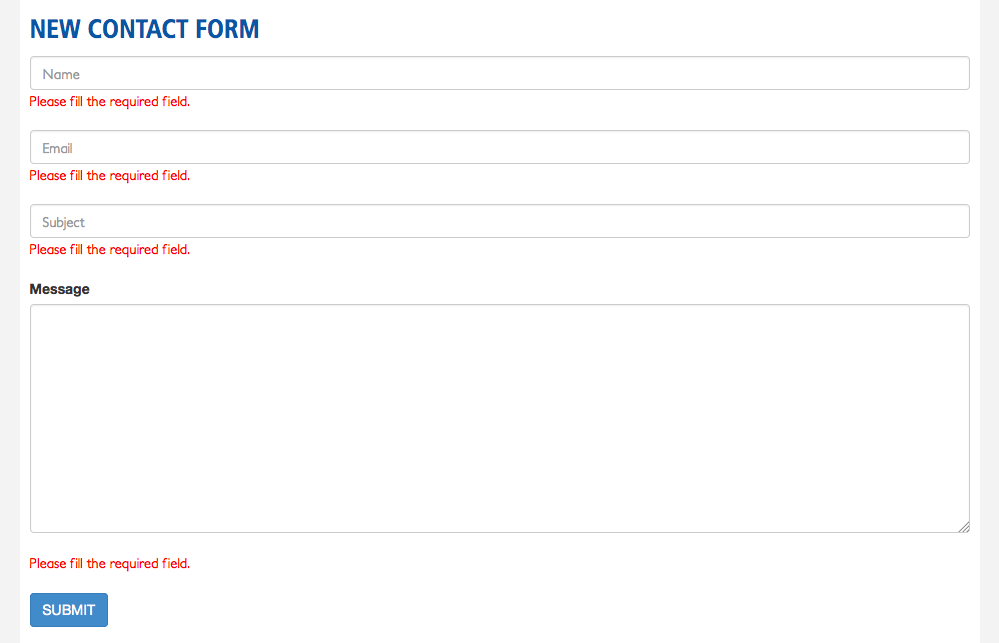
This is your new markup code in the template file. Note that the form elements generated by the Contact Form 7 plugin were integrated to the Bootstrap Form Markup.
See your custom form being driven by CF7. You are free to edit its styles via CSS custom stylesheet.
So far, I have shown you three amazingly simple but useful hacks to make Twitter Bootstrap’s features work with WordPress’ dynamic content.
Now that you have these simple instructions, I urge you to start extending your theme with these features and start telling everyone in your office or maybe to your client that you can already ‘wipe the floor’ with your competitor’s website.
If you have reached this part of my article, you might be telling yourself, “Thank God for the Internet! I just found the solution!”.

Happy hacking and you’re welcome!